 3D is all the buzz! But you have no high-tech stereo camera, just a fine SLR or even a point and shoot camera for regular 2D photos. Believe it or not, but that’s perfectly adequate! Your photos and AquaSoft SlideShow is all you need to create slide show videos with a hidden 3D effect – you just need to discover it! Let me show you how you can add great 3D effects to your slideshow project, without breaking the bank or learning complex technologies. Below is a video that I created from the sample slideshow project (download link at the bottom). Notice how the sky and the water slowly move along:
[youtube width=”640″ height=”386″]http://www.youtube.com/watch?v=GWrUu5OA1HU[/youtube]
Slicing and Dicing Images
The starting point for our 3D slideshow project is a single, ordinary photo. The 3D illusion we are about to incorporate is based on the optical effect that moving objects in a scene become smaller while they travel along its route. To achieve this, we will need the help of an application that can cut out (“mask”) all visible key elements from the photo. Masking can typically be done with any image editor such as Adobe Elements, Photoshop or even (as a free alternative) Paint.NET. You can save yourself a lot of time by choosing an image that has clearly distinguishable elements that are easy to mask. Our sample picture shows a scene near Lake Tahoe, Nevada, with my daughter and I in front of a cloudy sky and blue lake. This was fairly easy to separate in about 30 minutes, nicely sliced and diced into several image files, each showing a single visual feature (other elements of the photo appear translucent) and saved in PNG format .

Tricking the Human Eye
In our perception, the slower an objects moves the further away it appears to be (i.e., a car that drives off) . The 3D effect we will create uses exactly this perception and creates an optical illusion for the human eye. This makes us believe that the slideshow (derived from a single, flat photo) has a depth dimension – hence the 3D!
Our key tool for this is the Timeline panel in AquaSoft SlideShow. The timeline is a powerful feature that allows you to determine precisely what layer is shown at what time. The Layout Designer panel (usually located above the timeline panel and the central part for creating and specifying any image motion) allows you to specify the movement path settings for each object. To keep track of all this, it’s usually a good idea to group layers (tracks) in chapters that can be collapsed and expanded within the timeline (see below, tracks are grouped inside of “2d to 3d”).

Let’s start our sample project by adding the background elements first and then work our way to the foreground. The first layer is the cloudy sky, followed by the dark mountain ridge, the blue lake and then the small pier on the right hand side.
The Sky is Moving…
After the tracks with important image layers are place, it’s time to create some action in our slideshow project. At first, we will add some camera movement to the 1st layer that shows the sky. The effect that we want to create is that the clouds appear to slowly move out. To achieve this, we use a very simple trick: we let the clouds seem large at first, by beginning with an over-sized image of the sky. Then, we subsequently reduce its size over time.
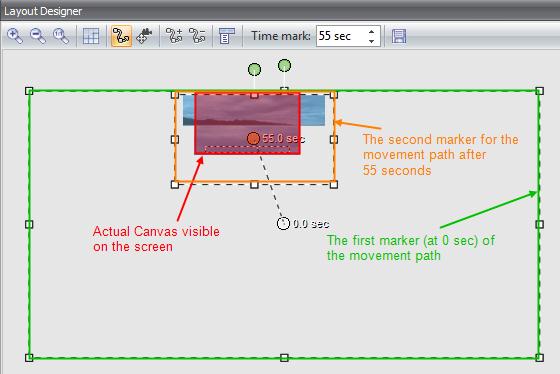
To implement this, we add a movement path with two markers in the Layout Designer (with the “snake-like” buttons). At the starting marker (shown in the screenshot above as green), we size the image several times larger than the actual visible canvas (highlighted in red). Notice that the canvas is fairly small, since we had to increase the size of the grey work area in the Layout Designer (by zooming out, via the magnifying glass button that has the “-“) in order to see the overly large starting point (the green frame). The second marker (shown in orange) displays the image much smaller, and slightly to the left. The specified time defines now how long the image will take to ‘travel’ from from marker 1 to marker 2 (while at the same time shrinking in size).
Since many outdoor photos contain clouds that can easily be cut out (masked), we recommend this technique as the first, simple step to add some “life” you your work when you make a 3D slideshow.
Here Comes the Water…
The second layer of our project shows the mountain ridge, which is in a fixed position on the canvas. In order to make the water appear more lively, we overlay this with the 3rd 3D layer that contains the PNG file that shows only water and then apply a similar movement path (two markers, reduces the image size along a motion path) as we did with the clouds. To improve the spatial impression, we overlay the pier element on top of the water (remains still).
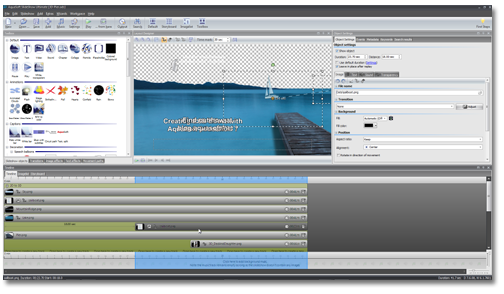
As with many things in life, the devil is in the details:
- take your time to select the right image elements that cut out nicely (skip that frizzy hairdo picture),
- make sure they have the same brightness, color saturation and direction of the shadow,
- when you place them, scale the items so that appear realistic – a dog can’t be bigger than a car, even if you like your pooch a lot,
- pay attention to the perspective /angle of all elements (i.e. the pier and the picture of my daughter and me “look” in the same direction)
- the right speed and direction of your movement path, along with a perfect starting and ending size of an element is pivotal to a realistic effect
In summary, creating a slideshow that incorporates one or more 3D effects is a fairly simple job. Once you sliced your image elements into separate files, all you need to remember is to apply a movement path that makes the element either become larger (moving towards you) or smaller (moving away from you).
Download and Try it Yourself
Our sample project can be downloaded here: http://dl.dropbox.com/u/24099696/3D-Pier.zip. The ZIP archive contains the project file (3D-Pier.ads), along with a sub-folder Data that has all pictures (sliced PNG, layered PSD original) and the sound track. Feel free to take the project simply as a template for your own 3D experiments. Replace the images, play with the movement paths and learn what kind of effects you can achieve with changing speeds. Enjoy!
In case you don’t have a license for AquaSoft SlideShow 7 yet, simply download our free trial (30 days) or install our freeware edition (free forever, but limited to YouTube output).





Tried to execute the sample project, but after downloading and executing SlideShow 7, it could not find the files.
John, did you unpack the files? They are in packaged in ZIP.